


Backgroundtaskhost.exe is a valid process and is part of the Microsoft Windows operating system. However, when working on your computer or launching an application, you may get a BackgroundTaskHost.exe error.
This is a system error, and the error message may vary depending on the user. Therefore, it is difficult to determine the cause of the error. Here, Thewindowsfan.com will show you some steps to fix this problem in Windows 11.
What causes the BackgroundTaskHost.exe error?
When this error occurs, you may see one of the following error messages:
- BackgroundTaskHost.exe – System Failure
- BackgroundTaskHost.exe – Application Error
These errors can occur due to incorrect registry modifications, third-party application conflicts, and file system errors. Unfortunately, there is no comprehensive solution to fix this problem.
How to fix BackgroundTaskHost.exe error on Windows 11
This article has listed some system troubleshooting steps to help you solve this error on your Windows 11 computer.
1. Perform Clean Boot

To see if a third-party application conflict is the root of the BackgroundTaskHost.exe error in Windows 11, run Windows in Clean Boot mode with the fewest drivers and starting apps possible.
You can perform Clean Boot Windows 11 from System Configuration. After rebooting, Windows will launch in the Clean Boot environment. Continue using the system and check if the error occurs. If so, proceed to the next troubleshooting method.
If not, look for newly installed apps on your machine. Go to Settings > Apps > Apps & features to accomplish this. Install date can be found by selecting Sort by in the drop-down menu. Restart the computer after uninstalling any recently installed programs like Dell Assistant that can be the source of this issue.
Also, check the update history of Windows 11 on your computer. Invalid Windows updates can often cause the system to function incorrectly. If you identify an update that’s causing the problem, you can uninstall Windows updates to fix the problem.
2. Run the System File Checker and DISM tools
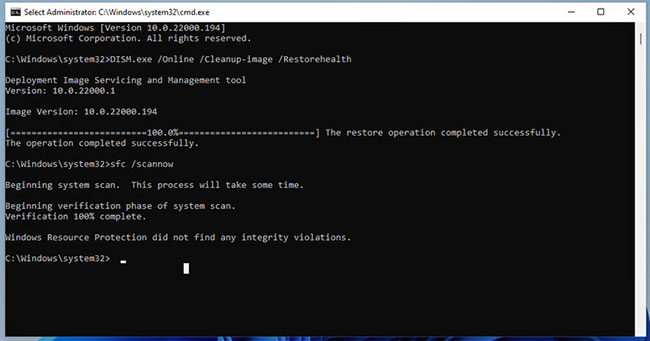
The System File Checker tool is a built-in Command Prompt utility. It allows you to scan Windows for system file errors and replace them with new files stored on the system.
Deployment Image Servicing and Management (DISM) is another command-line utility that you can run to repair Windows Image.
3. Perform a system restore
Windows 11, like its predecessor, creates a new restore point whenever you make a significant change to your system. Restore points allow you to undo your most recent changes and restore your PC to a time when it was error-free before.
This is a great recovery option when you encounter an error after making system modifications that may have damaged system files.
Keep in mind that not all systems have restore points enabled by default. There is therefore extremely little possibility that you have a restore point if you haven’t manually activated it.
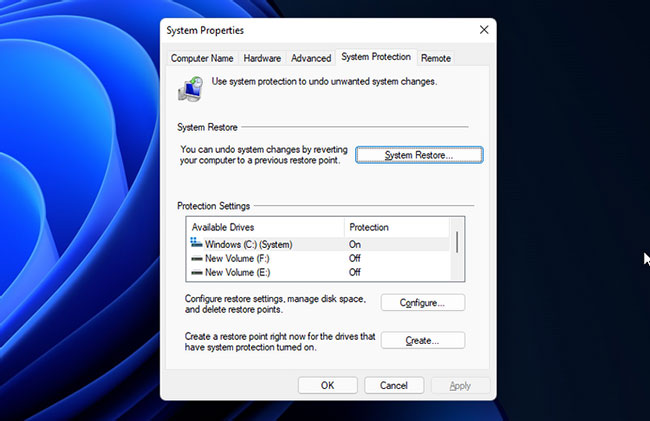
Step 1: Press the Win key, type system restore in the Windows search, and click Create a Restore Point.
Step 2: In System Properties window, Click on System Restore button.
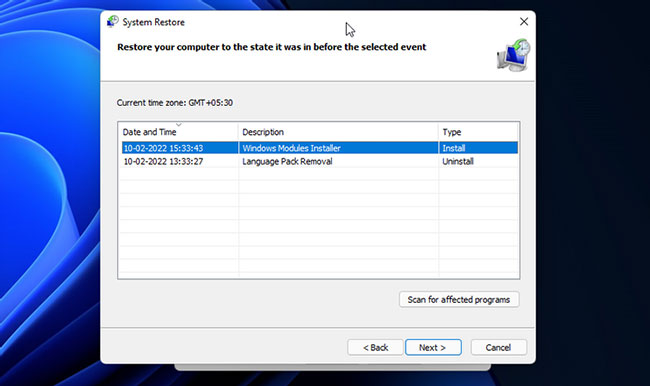
Step 3: If there is a suggested restore point, select it and click Next. Otherwise, select Choose a different restore point and click Next.
Step 4: System Restore will display all available restore points. Select the latest one and click Next.
Step 5: Click Scan for affected programs to see the programs and drivers that can be removed and restored in the process.
Step 6: Read the description showing the status, which will restore your computer. Click Finish to begin the system restore process.
This process will take some time, so wait until it’s completed. Your PC will reboot once the process is complete.
Once done, you will be greeted with a success message, confirming the system restore went well. If the error persists, try other restore points available to fix the problem.
4. Perform In-place Repair Upgrade
Fatal system errors often require a clean install to fix the problem. However, performing a new install is complicated because it will delete all files and applications and force you to start from scratch.
This is where Windows Repair comes into play. You can perform an In-place Repair Upgrade to reinstall Windows 11 without removing the application. This is a handy solution to many serious Windows problems that require reinstallation.
5. Windows 11 computer reset
If the reinstall doesn’t work, you can reset your Windows 11 computer to set up default settings to fix the error.
Reset This PC is a recovery option available on the Windows operating system. It allows you to reset your PC to defaults by removing third-party applications without affecting your personal files and folders.
The PC may reboot a few times during this process, so leave it idle. After that, you can set up your Windows 11 PC with a local user account or a Microsoft account.