


Here is a step-by-step guide for installing FFmpeg in Windows, including adding FFmpeg to the Windows path and verifying FFmpeg installation.
FFmpeg là một trong những phần mềm mã nguồn mở, miễn phí và phổ biến nhất để mã hóa và giải mã đa phương tiện. Bạn có thể sử dụng FFmpeg để chuyển đổi file video và âm thanh, tách file âm thanh, tải xuống video phát trực tuyến HLS, v.v… Điểm tốt nhất ở FFmpeg là bạn có thể thực hiện hầu hết những điều này bằng các lệnh đơn giản. FFmpeg is one of the most popular free and open-source programs for encoding and decoding multimedia. You can use FFmpeg to convert video and audio files, split audio files, download HLS streaming videos, and more. The best part about FFmpeg is that you can do most of this with simple commands.
In short, FFmpeg is fantastic, and every Windows user should install it.
TheWindowsFan.com demonstrates how to properly download and install FFmpeg in Windows 10, 8, and 7.
Install FFmpeg for Windows 10
In theory, since it’s portable, you don’t need to install FFmpeg to use it. However, you must manually navigate to the FFmpeg folder in the Command Prompt to access the ffmpeg.exe file and execute the relevant commands.
This isn’t a big deal, but it’s not very user-friendly either. To get around that, you have to add FFmpeg to the Windows 10 path using an environment variable. Once added, you can access FFmpeg through the Command Prompt or PowerShell from any folder.
Here’s how to do it:
Download FFmpeg for Windows 10
1. To get started, visit the official website and download the current stable build of FFmpeg.
2. After downloading, extract the contents of the ZIP file to a folder of your choice. In the example case, the author extracted it to the root directory of the C drive.
3. Rename the extracted folder to “ffmpeg“. Renaming is optional but will make things easier when you add it to the Windows path.

Adding FFmpeg to the Windows 10 path
4. To add FFmpeg to the Windows 10 path, search for “Edit the system environment variables” in the Start menu and click on the result. The System Properties window will open.
5. Go to the Advanced tab and click the Environment Variables button.

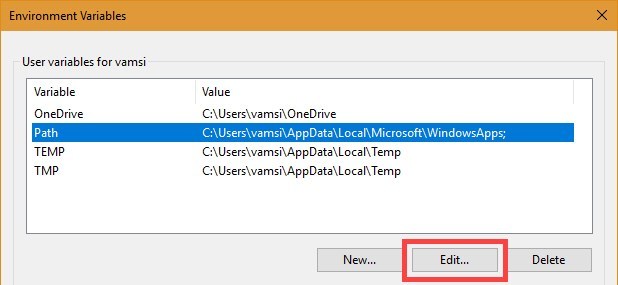
6. Select the Path variable and click Edit.
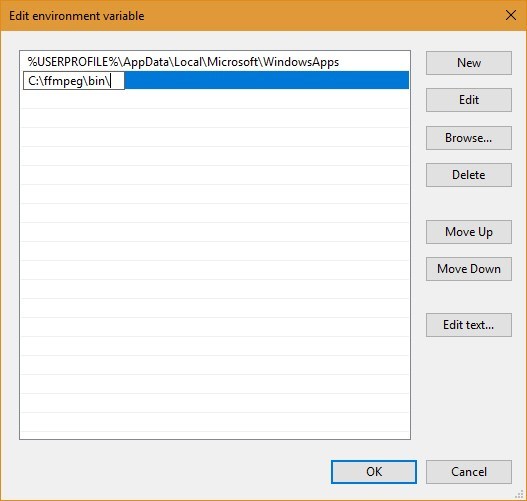
7. Click New.

8. In the empty field, enter C:ffmpegbin and click the OK button.
Note: If you have placed the FFmpeg folder in another folder or drive, change the folder path accordingly.
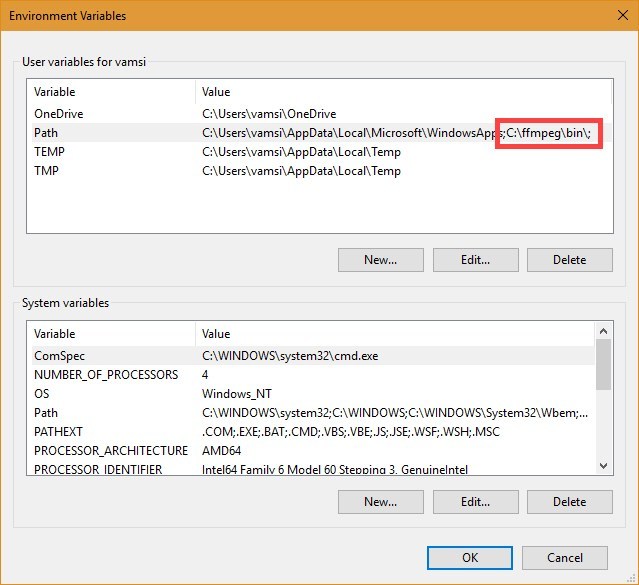
9. This is what it looks like in the main Environment Variables window. Click the OK button to save the changes.
10. Close the main window.
Add FFmpeg to the Windows 7 or Windows 8 path
The procedure for adding FFmpeg to the Windows 7 path is similar to that of Windows 10, but the user interface is a bit different.
1. Open the Start menu, search for “Edit System Environment Variables” and click on the result.
2. Next, go to the Advanced tab and click the Environment Variables button.
3. In the System Variables section, find the Path variable, select it, and click the Edit button.

4. Go to the end of the line in the Variable Value field and add ;C:ffmpegbin. Click the OK button to save the changes. Each path that you add to the value field should be separated by a ;.
Note: If you saved FFmpeg in another folder, then change the path accordingly.
Verify the FFmpeg path
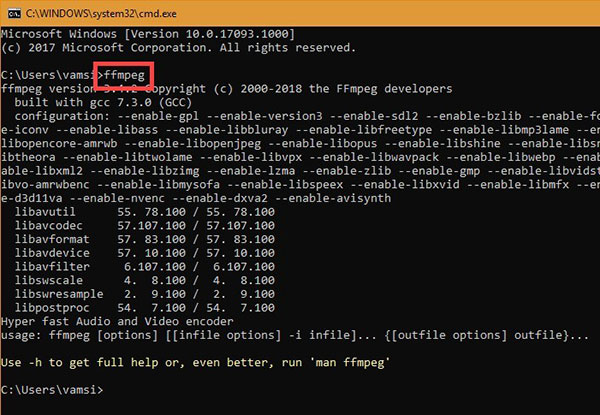
To check if FFmpeg is properly added to the Windows path, open a Command Prompt or PowerShell window, type ffmpeg, and press Enter. If all goes well, you should see FFmpeg details like the version number, default configuration, etc.