


If you are running Windows 11 on unsupported hardware, this new version of the Windows operating system will display a “System requirement not met” watermark in the bottom left corner of the screen.
This may not be a concern if you use the operating system on a virtual machine. But for most people, this message feels very uncomfortable. Fortunately, you can get rid of this annoying message by doing a trick with the Registry. Thewindowsfan.com will guide you through the following article!
Why does Windows 11 show the “System requirement not met” message?
Microsoft’s Windows 11 has much stricter hardware requirements than any previous version. If your system does not meet the minimum system requirements, including TPM 2.0, the installation will stop unexpectedly.
However, this problem has many solutions. You can bypass the restriction and install Windows 11 on unsupported hardware.
Although Microsoft initially permitted installation on unsupported hardware with warnings about security issues and a lack of future updates, the company has now decided to include a permanent watermark to remind users that their system is unsupported. A similar message may also appear in the Settings app.
How to get rid of the “System requirement not met” message
If you see the “System requirement not met” watermark on your PC, you can remove it by modifying the DWORD value in Registry Editor.
Follow these steps to remove the “System requirement not met” message on Windows 11:
1. Press Win + R to open Run dialog.
2. Type regedit and press OK to open Registry Editor.
3. In Registry Editor, navigate to the following path. You can also copy and paste the path into the Registry Editor address bar for quick navigation.
HKEY_CURRENT_USERControl PanelUnsupportedHardwareNotificationCache4. In the right pane, right-click the SV2 DWORD value and select Modify.
5. Enter 0 in the value data field.
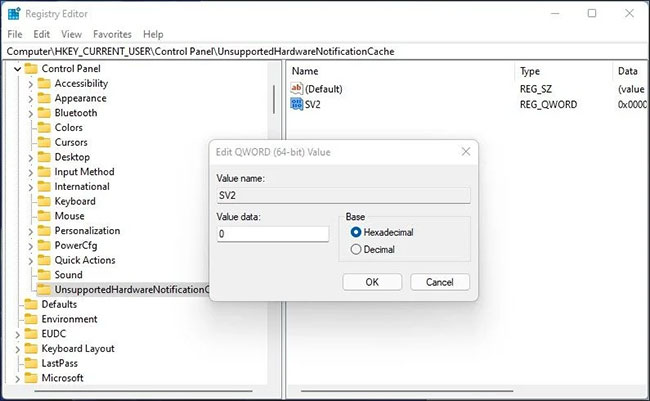
6. Click OK to save the changes.
7. Close Registry Editor and restart the PC to apply the changes. After rebooting, Windows 11 will no longer display the unsupported hardware message.
If you do not have the UnsupportedHardwareNotificationCache key, you will need to create a new key and set a value for that key. To do this:
1. In the Registry Editor, right-click the Control key (HKEY_CURRENT_USERControl Panel) and select New > Key.
2. Next, rename the key to UnsupportedHardwareNotificationCache.

3. Next, right-click on the new key and select New > DWORD (64-bit).
4. SV2 is the new name for the value.
5. Next, modify the SV2 DWORD value and set its Value data to 2.
6. Click OK to save the changes.
Turn off the “System Requirements Not Met” message with Provided Key
Disabling the “System Requirements Not Met” message by manually interfering with the Registry can be cumbersome and, in some cases, even risky if done incorrectly. The link to the downloadable ZIP file below contains the REG file that will help you make the above changes easier and safer:
- https://www.howtogeek.com/wp-content/uploads/2022/03/DisableSystemRequirementsNotMet.zip
(Note: You should always be cautious with files downloaded from the Internet, especially if they are EXE (executable files) or REG files. In this case, you can open REG files in Notepad or any other plain text editor to verify that they only change the registry key specified in the article).
Download the ZIP file by clicking the link, then extract the contents anywhere you want on the system. Note that File Explorer on Windows 11 has a built-in ability to decompress ZIP files.
Right-click on the ZIP file, then click “Extract All“. Follow the prompts, and a folder with the corresponding name will be created.

Now, double-click on the key named “Disable_Unsupported_Message.reg“. When prompted, give the key permission to make changes to your registry.

Restart the computer after the key has been applied.
Note:There is another REG file included in the ZIP file, which, when activated, undoes the REG file “Disable_Unsupported_Message.reg” in case something doesn’t work properly.
Maybe this message will reappear with new updates. So you will need to repeat the steps after installing the update.